My Kniterate Sweater Workflow

Idea… something… something… something… Kniterate… something… sweater ;)
A couple of weeks ago I was asked about my project workflow with Kniterate. From inspiration to finished project, the way I work with the Kniterate differs little from the way I work with other machines.
Before getting started with a design, however, it’s good to know the capabilities of the machine and to be familiar with the properties of the fibers being used. Though it’s almost always possible to make creative use of a machine without knowing everything about its capabilities, knowing what a machine can and can’t do is the best place to start no matter the equipment, as it impacts the design. With each software update and every new yarn and idea, I continue to learn what I can do on the machine. After four years with the Kniterate there are still several techniques I look forward to trying.
I am not responsible for creating a knitwear line at this time and am very happy to have this luxury. I consider my swatches an end product and developing a swatch is my favorite thing. If I am going to design a sweater, I prefer avoiding classic shapes. I have nothing against classic shapes; it’s just that I’ve done so many. For these reasons my process differs from that of someone designing for manufacture. My process is not for small batch or major production. These are the steps I take to create a single sweater that will never be replicated (though I may reuse certain elements). There will be no second and third samples. Grading (sizing) will not come into the picture.
Could this process be used for a proto-sample? Maybe. But I would most likely try to keep efficiencies in mind as I designed, if it were.
My current eight-step process is below, followed by explanations of the first four steps. The remaining four will be in a future post.
Sweater Design Workflow
Choose texture(s) and technique(s) to explore.
Knit and test swatches. Repeat, as necessary.
Make a rough sketch or other flat representation of the sweater.
Create a technical design for the sweater pieces.
Knit shaped pieces.
Steam block each piece.
Seam the sweater and embellish (if part of the design).
Wash the sweater and lay it flat to dry.
A Texture or Technique to Explore
Sometimes inspiration comes from nature, and sometimes it’s from human-made structures. For the current project I was prompted by a thought problem, based on a previously knitted texture. An early unexpected swatch left me with a few questions. Why did I get a relatively solid fabric with this lightweight yarn (below) when I was aiming for something airy and lacy? Was it because wool is a little stretchy? This is usually a property I love about wool.

Tucked, racked, knitted on the Kniterate
Would knitting this stitch pattern in a cotton fiber with less stretch produce the openwork fabric I envisioned and as I’d produced previously with other machines? Or would I need to add a couple of unworked needles between the occupied needles to get the effect I wanted? There was only one way to find out. And if it works, I’ll knit a sweater out of this one.
Knitting and Testing
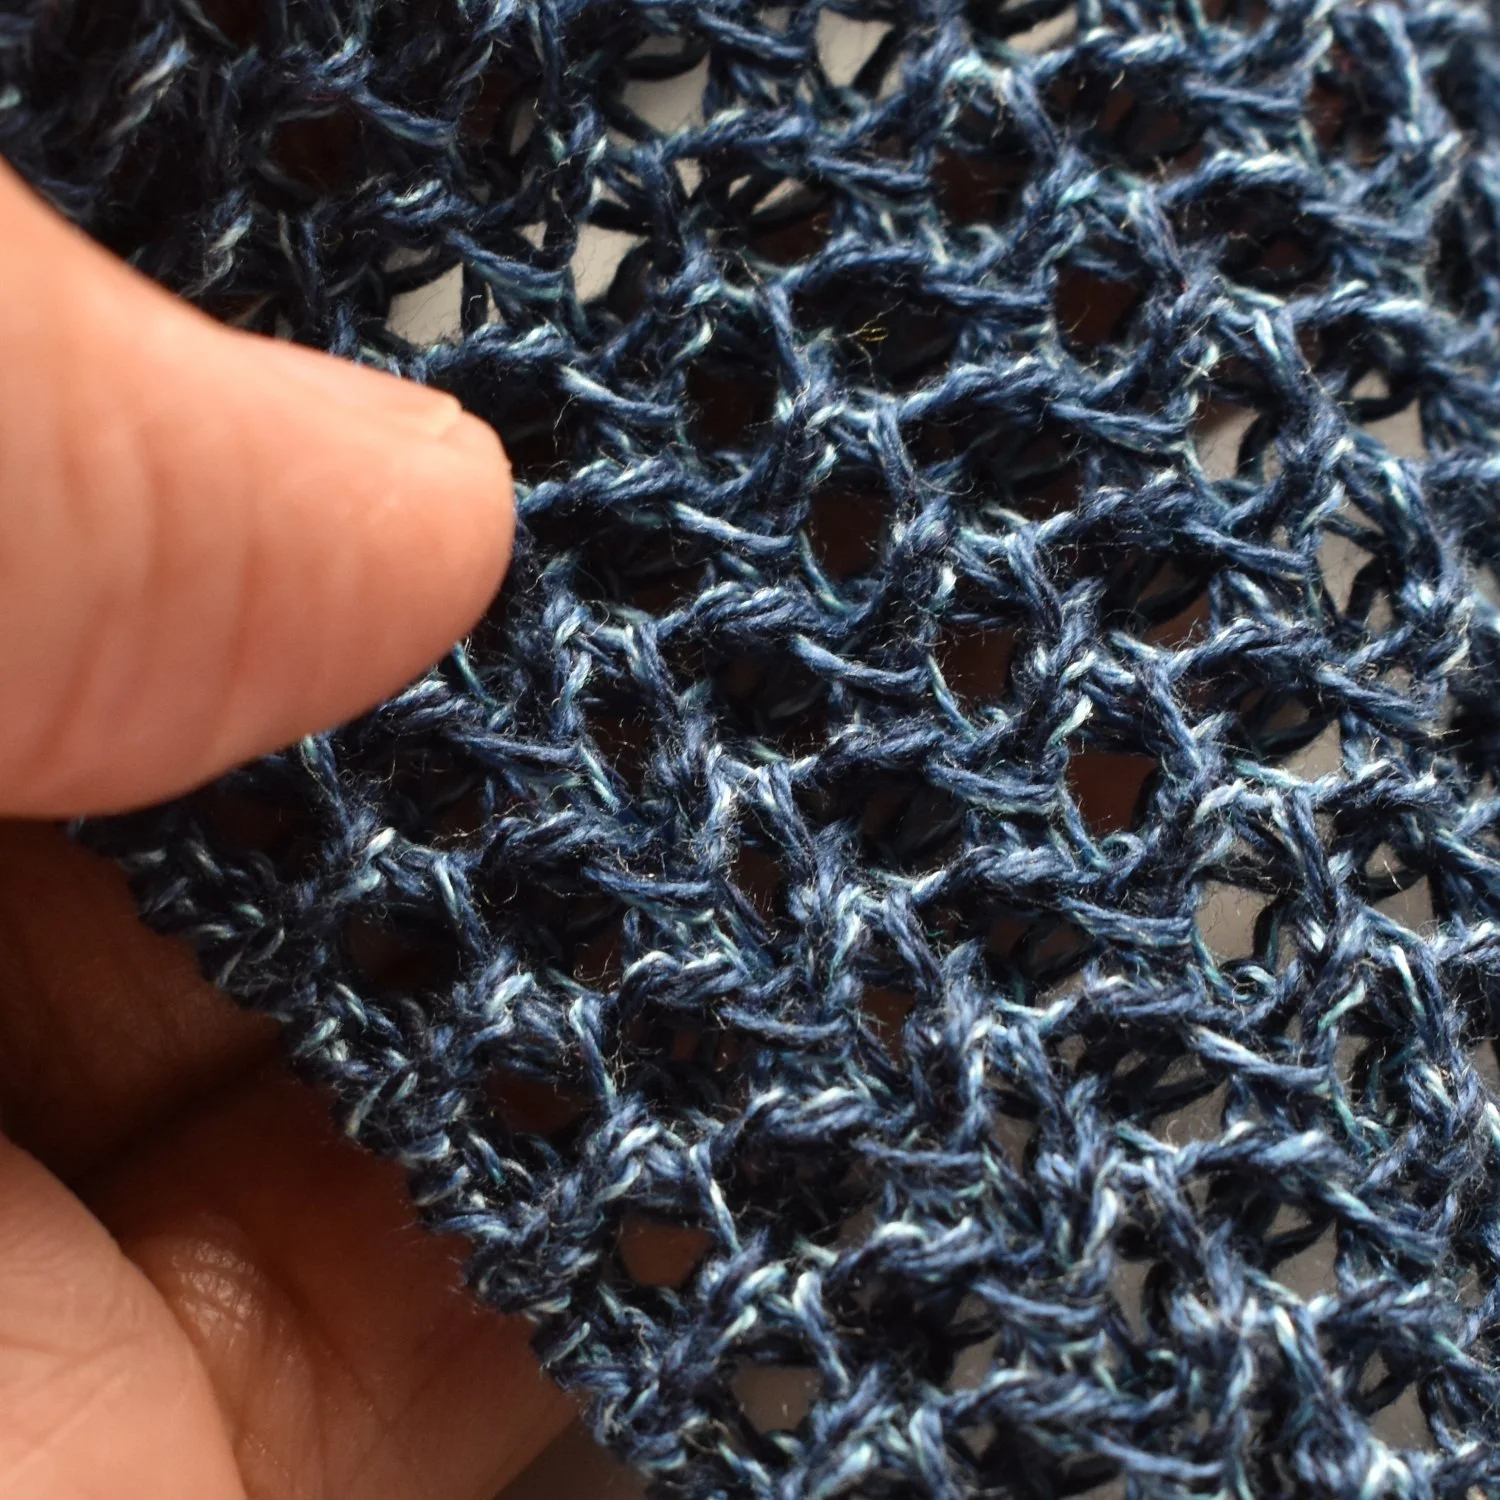
The new swatch up close
Yes, this is what I was going for. At first glance it’s hard to believe the swatches have the same stitch pattern and are knitted on the same machine.
With each project I try to learn something new. With this stitch pattern my big accomplishment was getting the takedown just right when racking with the not-so-strong cotton. I also managed a successful bind-off with this untried mix of three different cotton yarns.
After getting the settings right for the texture, I ended up developing two more stitch patterns I thought would go with the initial design in the same yarn combination. I adjusted settings for interleaving, increases, and decreases. I tried knitting the three yarns with the lighter blue yarn going through the plating slit and then I tried the yarns marled. (I preferred the marl.) Altogether I knitted about a dozen more swatches.
Rough Sketch or Other Representation
I usually make quick rough sketches to remember an idea I have. Once I know I’m making a sweater and have my swatches, I like to arrange them as if they were a sweater to get a better idea of what the final design might be. Photographing the arranged swatches and doing a quick edit helps too. Kind of quaint when you consider the 3d fashion design software available now!
This is what I came up with. Textures are not to scale. Actual sweater will vary.

Not shown: Possible duplicate stitch embellishment in contrasting color at the trailing end of slit for added support with a contrasting duplicate stitch in a small area of the sleeve bind-off to visually offset the touch of contrasting color at the neckline. The second sleeve’s bind-off cannot mirror the first sleeve’s cast-on. The few duplicate stitches at the cuff will make the difference appear more deliberate.
Make a Technical Design
This is where I go back into the Kniterate design app and program the stitches into shaped pieces for the garment in the correct size this time. The swatches I knitted earlier act as gauge swatches.
This sweater will have three pieces — front, back, and a sideways knitted sleeve-yoke-sleeve piece. I did not use DesignaKnit this time. The macros in the Kniterate design app were all I needed for minimal shaping. Increases and decreases shape the drop stitch sleeves. The properties of the sideways flat rib yoke, preceded and followed by a dropped stitch pattern created “shoulders” in the combination swatch I knitted. The sideways yoke will have a vertical slit for the neckline, which will have the full needle rib as support and trim. The cuffs are flat tubular knit.
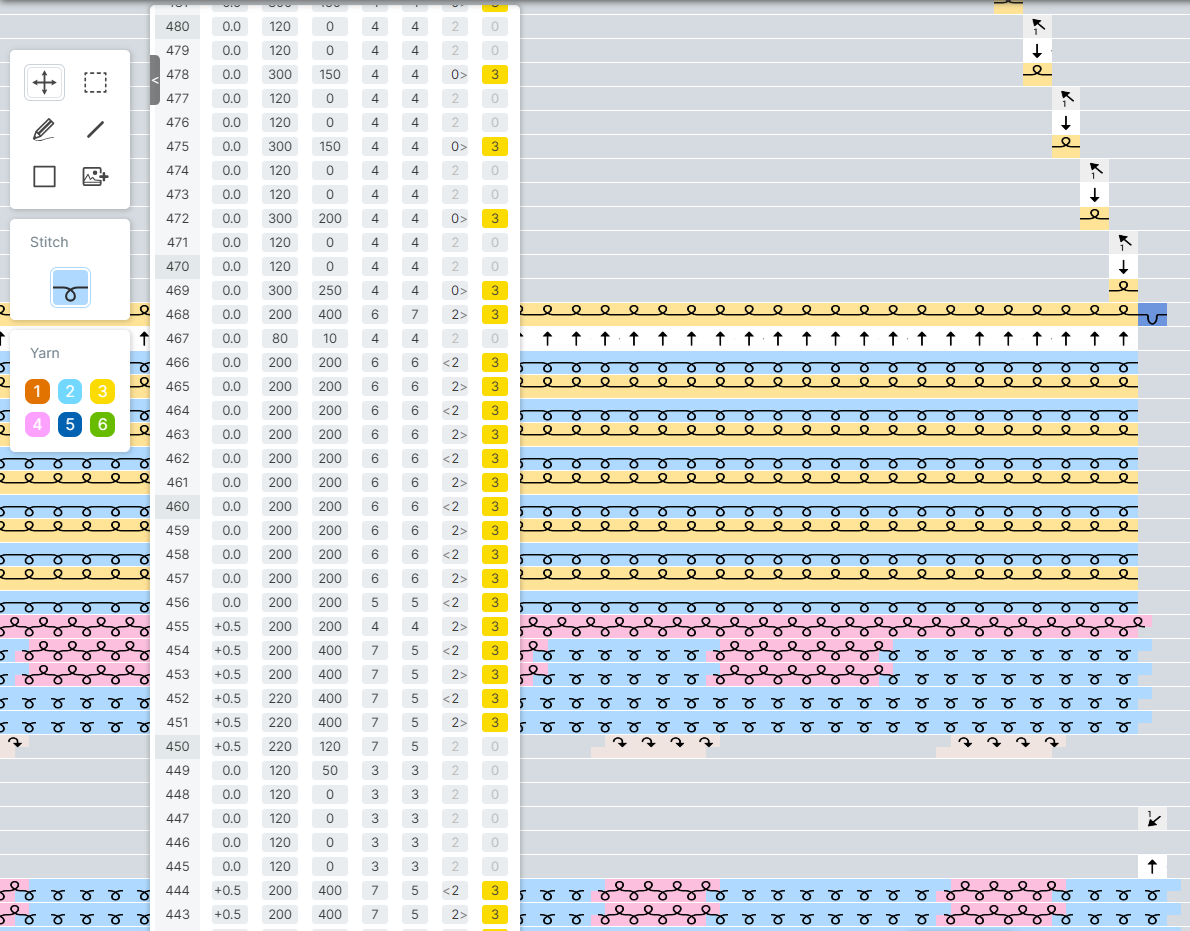
End of the sleeve-yoke-sleeve sample in the Kniterate design app
If you’re a Kniterate user, you may be interested in my prerecorded Designing with Kniterate classes. If you’re not an owner yet, I’d be happy to give you a virtual tour of the machine.